# CW20 Exchange
## ntroduction
This guide shows you how to create an Embeddable, using a CW20 Exchange application.
### Prerequisites
Before using an embeddable, you will need to have an App built to integrate into the embeddable. In this example, we will be using a Exchange App similar to the one built in the [CW20 Exchange](https://docs.andromedaprotocol.io/guides/guides-and-examples/ado-builder/cw20-exchange). So before continuing with this guide make sure you have done the following:
{% hint style="success" %}
You can use this link for the CW20 token logo in your application:

{% endhint %}
* Created an Exchange App
* Set up the exchange sale.
{% hint style="warning" %}
You can create an \*empty\* embeddable, then add content later with the Edit feature in the Embedding. If you do this, though, your Embeddable will appear empty until you insert content.
{% endhint %}
## Let's Get Started
### **Access Embeddables Page**
Connect your wallet to the web-app. Go to the dashboard, and select "**Embeddables**" (the <> button) from the sidebar on the left of the page:
Similar to our Apps in the assets page, each embeddable you create is linked to your connected address and chain. This means changing the connected wallet or chain will change the available embeddables to view.
### Setting up the Embeddable
To start a new embeddable, click on the " **+ New Embeddable**" button:
This will open up a panel that has the configurations for your embeddable. Here you specify the following:
1. **The Coin Denom:** The token micro-denomination to be used to buy from your application. Since I am using the Andromeda chain in this example, then I will use "**uandr**".
2. **App Name:** The name of embeddable application. Will be presented as header in your embeddable page.
3. **Twitter URL:** An optional url for the twitter account of the project that will be presented in the embeddable.
4. **Banner Image URL:** An optional URL pointing at a banner image which will be displayed on your embeddable. Must start with "**https\://**".
### Adding the Type of Embeddable
Now we need to add the type of collection we are looking to embed. Since our App in this example uses the Exchange ADO, then we need to select the exchange embeddable. Press on "**+ Add Collection**", choose "**Exchange Embeddable**" and click “**Add Collection**” again.
### Configuring the Marketplace Embeddable
Adding the marketplace embeddable opens a new panel to configure. Here we need to specify the following:
{% hint style="info" %}
It is recommended that you open the assets page in a separate tab to be able to copy the needed information as leaving the current page will delete your progress so far
{% endhint %}
* **Exchange Address:** The address of the Exchange component in the App.
Go back to your **Assets** tab, open the App that contains your Exchange component, then copy the address and paste it in the embeddable panel:
* **CW20 Address:** The address of the CW20 component in the App. Also copy the address of your **"cw20"** ADO and paste it in the embeddable panel.
* **Exchange Name:** The consumer-facing name for this Embeddable. Name it whatever you wish!
* **Twitter URL:** An optional url for the twitter account of the project that will be presented in the embeddable.
* **Description:** A description for your application that will be posted on the main page.
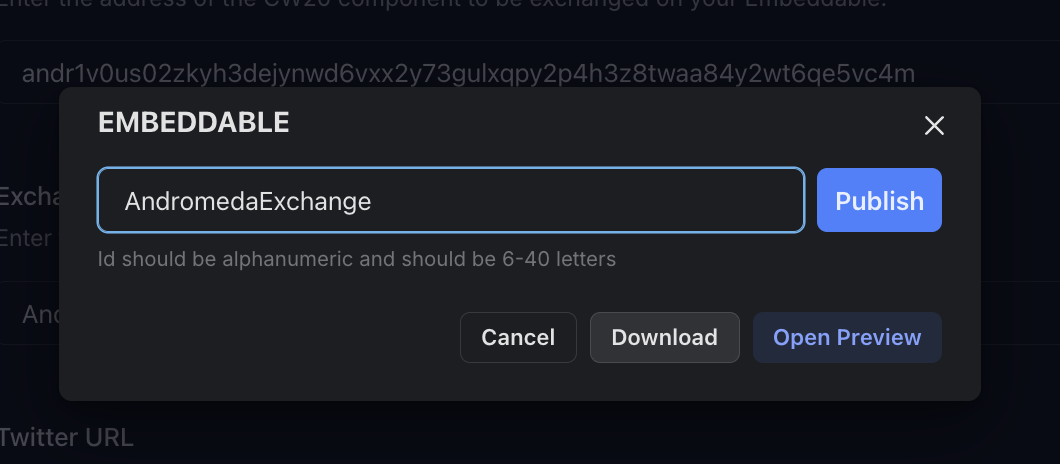
### **Preview and Publish**
Now that he embeddable panels are set up, we can publish our embeddable. Before publishing though, we can preview the interface to make sure it looks the way we want it:
* **Click Publish,** which will invoke a preview/download popup
* **Preview:** Click "**Open Preview**" to view your Embeddable’s preview page.
* **Name and Deploy:** If everything looks good, go back and name your new Embeddable, then hit “Publish”.
{% hint style="warning" %}
You cannot have a space in the name.
{% endhint %}
Your embeddable is now live, after you approve the transaction.
### Checking the Embeddable in your Web-App.
Go to the Embeddables page, click the ‘three dots menu’ (…) on the upper right corner of your new Embeddable, then click VIEW to see your new Embeddable.
### Viewing and Sharing your Embeddables
Click the "**Deployment**" link on your Embeddable to view the Embeddable’s deployed page. This link can be shared with your users to be used to interact with your Application. In our case, they would be able to buy CW20 tokens.
### Editing Embeddables
Clicking the Update button on your Embeddable's dropdown menu allows you to update the Embeddable’s details: